
Mass Planner is a tool I've used for a while now and it has worked really well for me so I've decided to do a review and tutorial for this tool as it will be useful for anyone who is managing Social Media accounts whether it's for your own accounts or for your clients. The cost of this tool is low and for what the tool does its well worth paying for. Mass planner no longer offers a 6 month plan and have only a month to month pricing system. The cheapest option allows you to manage up to 10 profiles and costs you $19.97 per month. On the higher end where you can manage up to 500 accounts it will cost you $99.97 per month. It only works with windows at present so for those of you with Macs, you will need to do whatever it is you do to get windows working on your Mac, whether that is using a virtual desktop or similar.
Mass planner is software that will do things like unfollow people who don't follow you back, it will follow people who follow your competition and it has many other settings that will allow you to build up a good social media profile and following. This tool doesn't just work with Twitter, it works with LinkedIn, Facebook, Instagram, Google Plus and Pinterest. You simply pick the settings for each of your social media accounts and this tool can work all day every day for you doing all of the grunt work that no-one likes doing. This has surely got to be worth the monthly subscription fee as this can work 7 days a week for you and it is pretty much on autopilot which is exactly how everyone wants to see things work.
Dashboard

Above is Mass Planners dashboard. Once you have your operations up and running, you can see the date and time that each one is being carried out. Checking back here regularly lets you know how smoothly all of the tools are running. If any errors were to occur, this area is first to let now. The next step is adding your social accounts.
Social Profiles
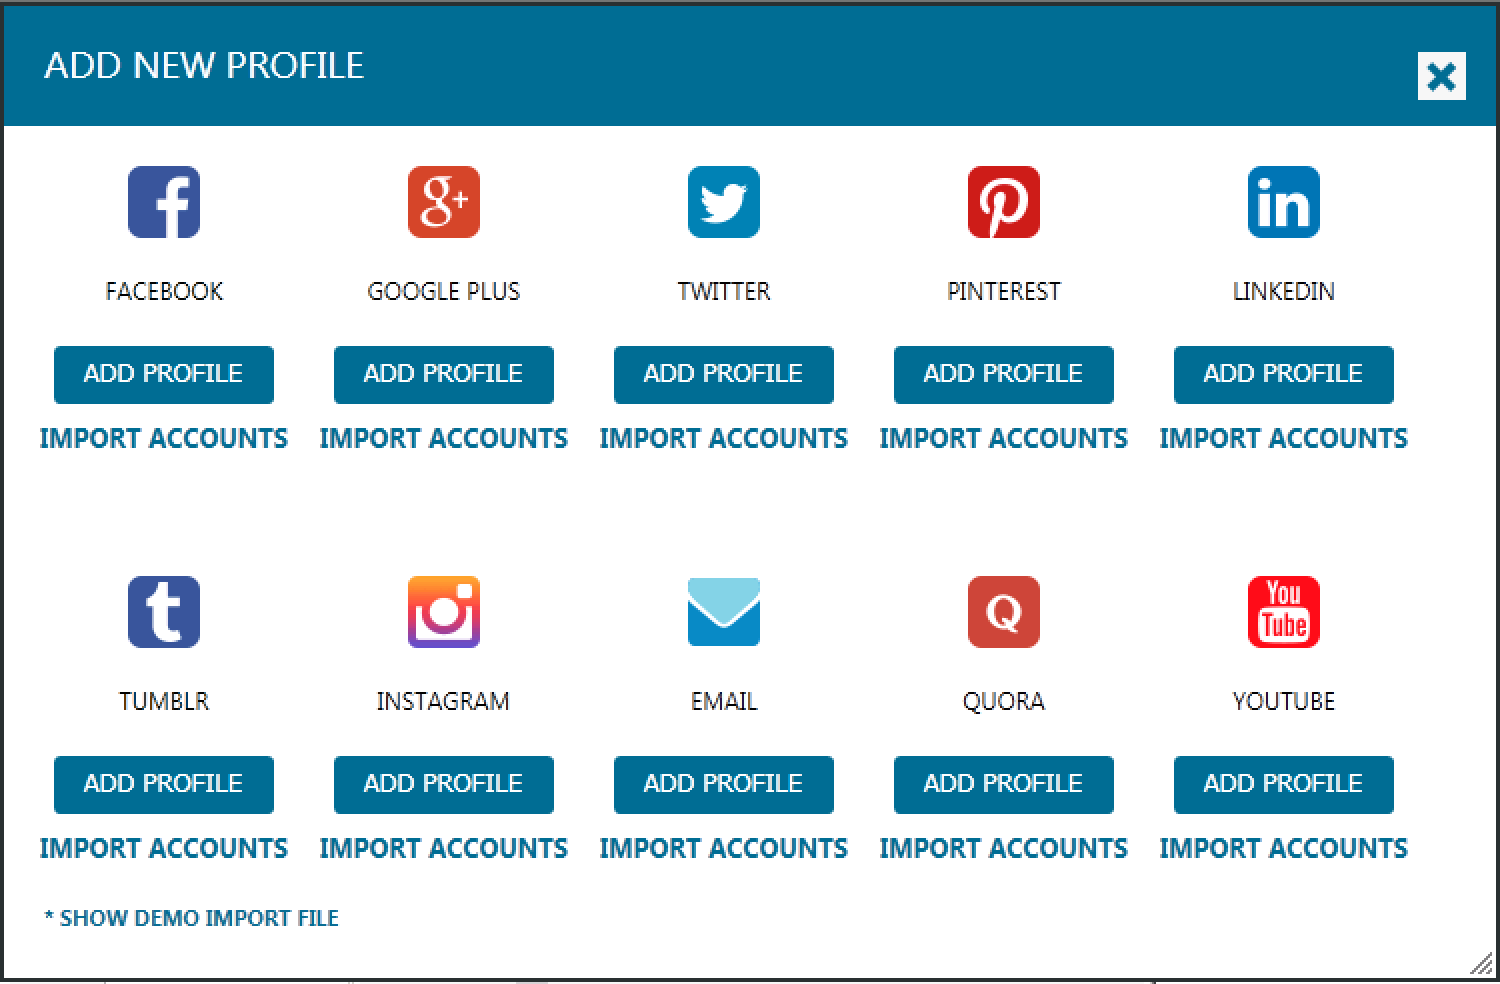
The first thing that needs to be done is creating a profile. To do this, click on the "social profiles" button which is displayed on the left-hand side menu. From there, click "Add Profile" and the below screen will appear with the following social profiles to choose from.
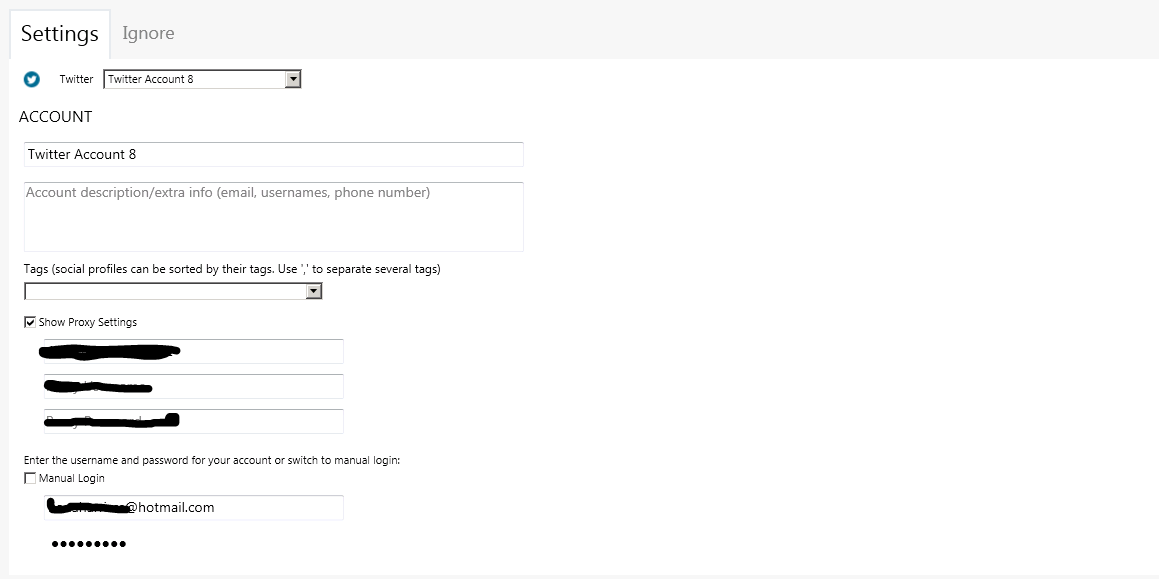
Now you have added a new profile, this is where you can fill out the log in details of your account. The example that I will be showing here is for the setup of a Twitter account. Under username or email, you put in the login details for the account, if you are going to be creating multiple accounts then you should really be using proxies to help prevent the social media account getting banned. Check the box that says "Show Proxy Settings" which will then open up the area you can enter your proxy information. Next is where you enter the username and password of your social media account. Now you're ready to verify. (If the validation happens to be unsuccessful, then you can click on the "manual login" option. This will open up a browser for you to enter the details on the website yourself). Once the account has been validated it will appear in the social profiles menu on the left-hand side. Now your account is verified you're ready to start using Mass Planners features. Just click on the "tools" button that appears on the right of that account.
Proxies
Proxies are your way of making sure that every one of your social profiles has a unique IP address. When logging in and out of social profiles, the social platforms can usually detect when it all comes from the one location. Using proxies means that you are masking your current location with another so you can run multiple profiles all without looking suspicious.
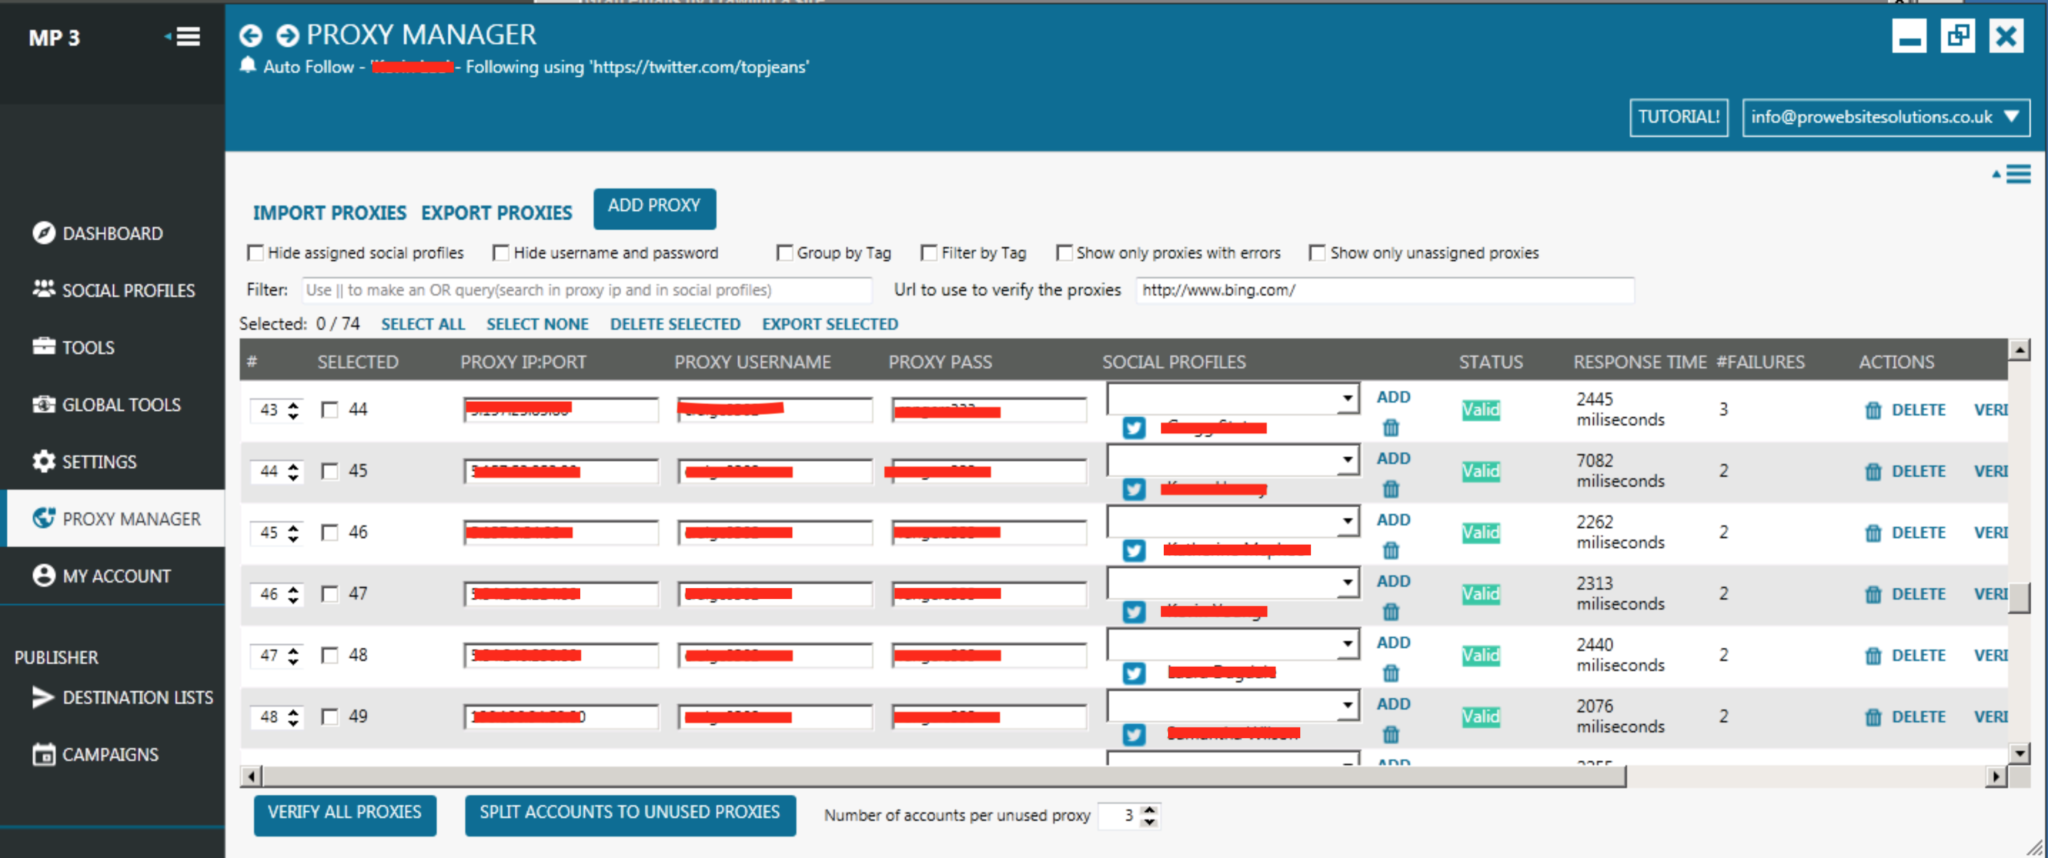
You can add your proxies while creating the social profile like described earlier or you can add them in the "proxy manager" section. The thing about proxies is you will need to rotate them every 30 days or so depending on the company that provides you them so this section makes it easier to swap them in and out. Beside each profile in this section is also a verify button which lets you check that your proxies are actually working. Once you've done this, if you head back to the "Social Profiles" section, you will want to reverify all of the accounts here to get them to actually start running again. With this information, you can then go ahead and book yourself in for the perfect mass planner tutorial. The Global tools section is where you can use any of the Instagram that you've created, and filter out any of the bad accounts that you are using, which you can then take on as it's on accounts for you to go ahead and use.
Tools

Before we go ahead and start using the tools that Mass Planner has to offer. This menu is where you can see an overview of the tools that you have running. It gives you the stats on what kind of progress your tool has made through the start of the account. For example, you are shown all of the tools running on an account so you can turn off certain tools like "Follow" and keep "unfollow" running. What I suggest doing is checking this section every so often, especially after changing proxies. Changing these can sometimes cause certain tools to stop running etc. So as you can see from here you can disable/enable any of the tools, with the"more tools" button taking you to the setup for each of them.
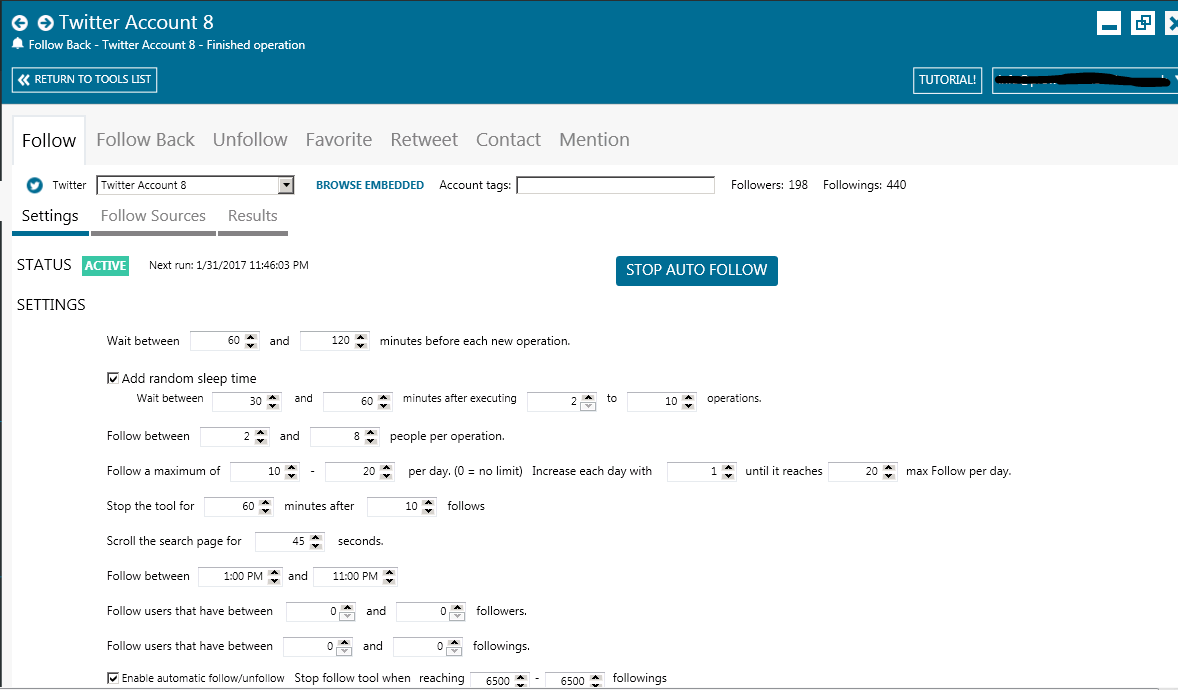
In this example, I am using a Twitter account. Once you click on the "More Tools" Button, you should see the screenshot above. The first setting allows you to choose how long you would like to wait between operations. (Operations is what mass planner calls the action that you are planning on carrying out). When you first start using this tool on an account, it's important to build your following slowly at the beginning. When using Mass Planner, you want everything to look as natural as possible.
Following hundreds of accounts without rest is extremely obvious for Twitter to pick up on. The key is to make the bot act like a human user, but the beauty of it for you is that you don't have to put any work in after this initial setup. So with this in mind, you can go ahead and set the time to wait. I would recommend you set this to anytime after 30 minutes before starting a new operation. The next option on the list is to "add random sleep time". This is where you can set mass planner to randomly stop running for a certain period of time. You might want to use this feature to make the bot stop through the night for example. It is again another way of keeping your account under Twitters radar It then asks you to input the number of people you would like to follow per operation, with the option of choosing a limit to follow per day.
Setting a limit means you can be safe in the knowledge that Mass Planner won't follow far too many people resulting in your account being banned. Next up is the option to choose how long the tool will stop for after following a certain amount of people. Under this is how many seconds the tool will scroll through a webpage. Most human users will scroll through pages for a least a couple of seconds before moving on. Having this feature further helps keep your account stay live. "Follow Between" is where it gives the user the option to decide what time of the day they want the tool to work from. A human user is very unlikely to be following 24 hours around the clock, so this would look suspicious.
There are also certain times of the day that people will be more likely to follow you back. This can vary depending on the type of market/people you are looking for so be sure to research this and set the time accordingly. You also have the option to only follow people that have X amount of followers and/or following X amount of people. You want to avoid following accounts that have a very low amount of followers as there is a good chance that these are fake accounts. Again, this is subject to whatever market you're targeting so be sure to keep that in mind when setting these limits. The next screen grab shows the options available at the bottom of the page.
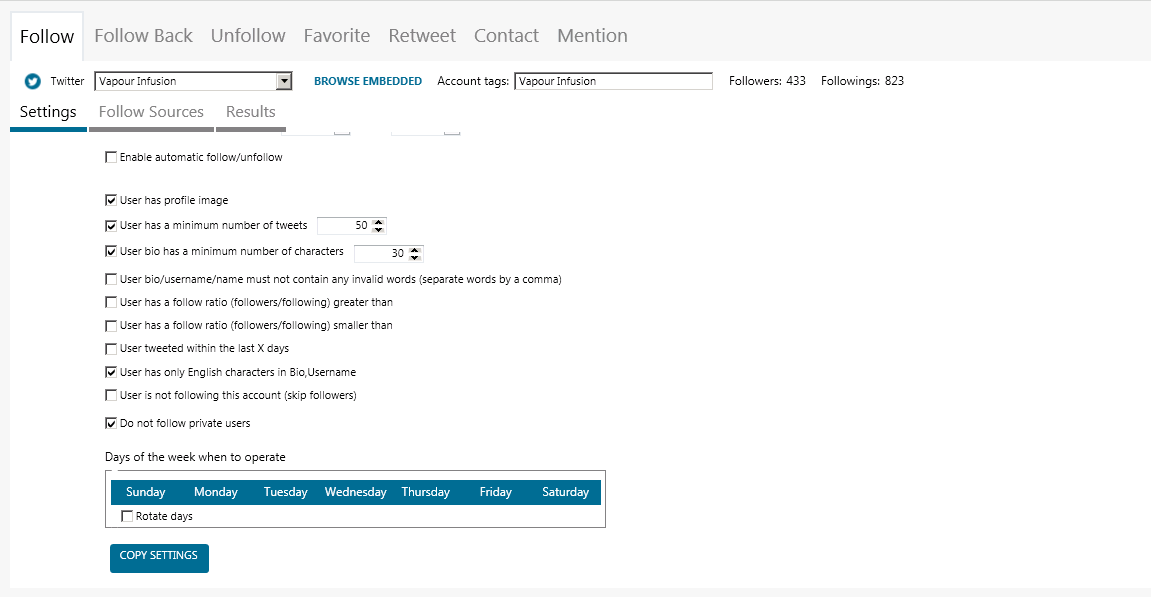
The first option that you can make is to stop following when you reach a certain amount of followers or when the ratio of followers/followings has reached smaller than X amount. This allows you to keep the accounts balance right. For example, if your account is following thousands of accounts but only being followed by a handful of people, your account won't only be flagged by Twitter, but real users will also begin to question if your accounts legitimate or not. Lastly at the bottom, there are a list other options you have to mess about with. For example, you may want to tick the box that says "user has profile image". These accounts are more likely to be real people than ones without.
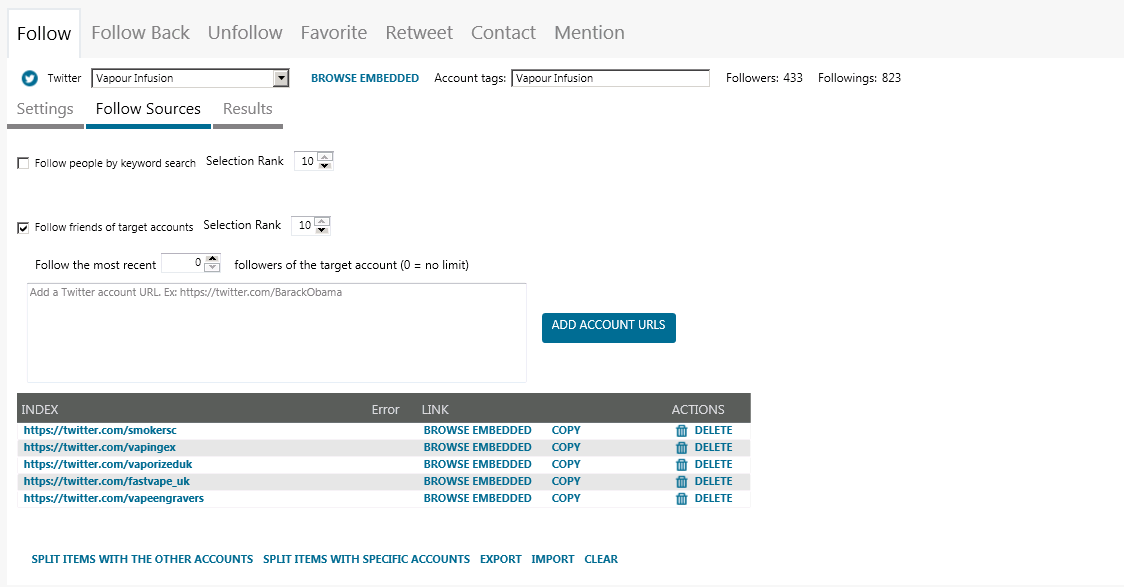
Once this is all done, select the tab "follow sources". Here is where you select what sources Mass planner is going to use to start following people. Before I go over the different sources I'll first go over the ranking system that works with a scale of 1-10, with 1 being the smallest and 10 being the highest in how likely it will be used. For example, if two sources were selected, one with a ranking of 2 and the other with a ranking of 6. The one with the ranking of 6 will be used a lot more than the rank 2. With Twitter, you can use keywords to find your target accounts. Once you've begun following keyword targeted accounts you can start following the friends of these accounts as well as friends of individual accounts. Just enter the URL of the accounts into the box and Mass Planner will begin following their followers with no limit on how many you want to target. Below are a few more options that you can choose from, select whatever ones you want and that's you finally ready to start using Mass Planner. Now you're all set up, it's time to start following. Click on the "Start Auto Follow" button and let the tool work its magic.

Follow Back
This is the page where you set how often you follow back people that are already following you. The settings are similar to those before it where you can decide how many people you follow per operation and how long you wait between each operation. Once you have filled out the info on this page, select "Start Follow Back", found in the top right corner of the page. This has been the setup for the "Follow" and "Follow Back" section of Twitter. As you can see along the navigation bar there is a lot more that you can do just on Twitter alone. Tools such as "follow back" "Favourite" "Retweet" etc all have a very similar setup to the example we just went through above so you should work your way through these to make the most of Mass Planner.
Now that you have used the Twitter tool you'll have a better understanding of how Mass Planner works. The Facebook tool works in a very similar way but I will show you the main features that you should consider using:
Page Finder
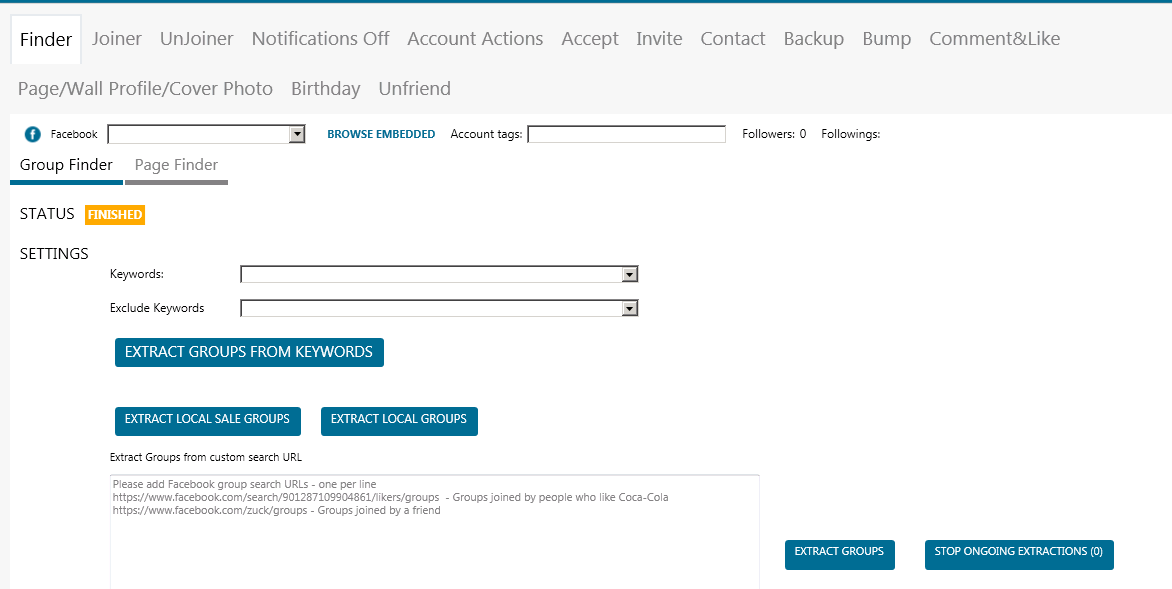
The page finder is a similar setup to the Twitter "follow" tool. There is a keyword section for you to enter words that relate to whatever niche you are trying to target. You can also exclude certain keywords from the search to help narrow your results right down to your targets. Next up is the maximum/minimum amount of likes that a page has before you add it to your finder. The number of likes that you should expect to see on a page is completely down to whatever your niche is. Lastly is the number of pages to find per keyword. Once you have your list of pages, you have a few options. You can export and import the lists that you have, as well as adding certain pages to the comments and likes section. These pages can then be used later on when you are looking to like and comment on pages/posts.
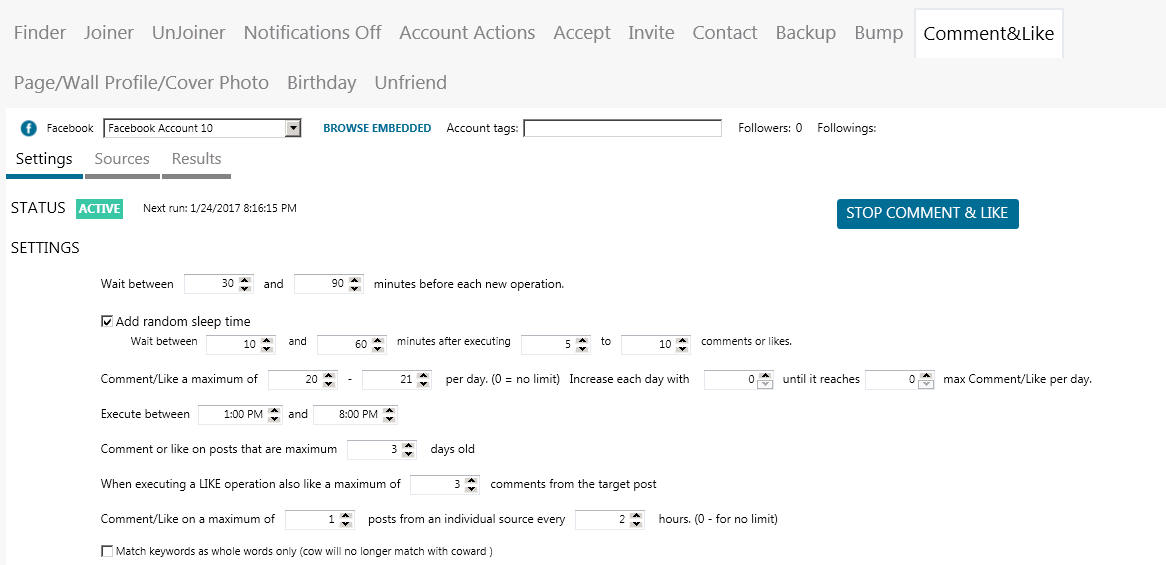
Comment & Like This section is where you can use Mass Planner to comment on and like pages. The setup here is just like the Twitter "follow" section, you want to again fill out these details with the goal of making everything look natural to Facebook so your account doesn't get banned.
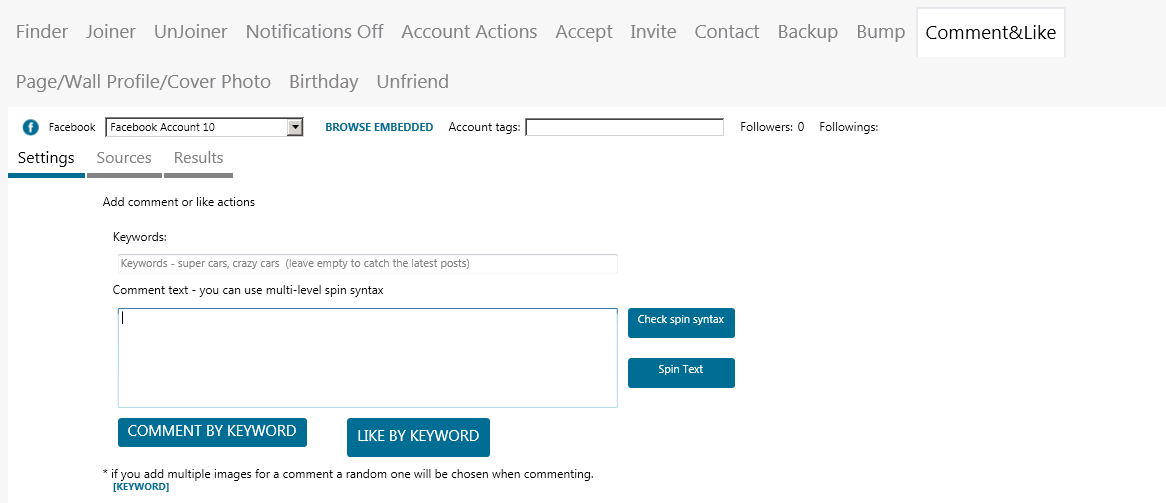
The main difference to this section is further down the page there is a keyword and comment box. This is where you choose what kind of pages and posts that you like and what you say in the comments you post. The comment box uses syntax to create multiple comments(there are lots of spinners available that put text into syntax for you) Once you have your keywords and comments lined up, you can click on either "comment by keyword" or "like by keyword".

This will then be placed into the area below, which you can see in the above screenshot. After you've finished with this, the last step is the "sources" tab. If when you were using the "finder" tool you chose to send the pages to comments & likes, then you should see a list of facebook page URLs and this is the list that the tool will begin posting to. You can also manually enter URLs for pages and groups here as well. Now you're all set it's time to click "start comment & like". Leave this to run in the background and soon see your facebook profile actively commenting on and liking pages relevant to your niche.
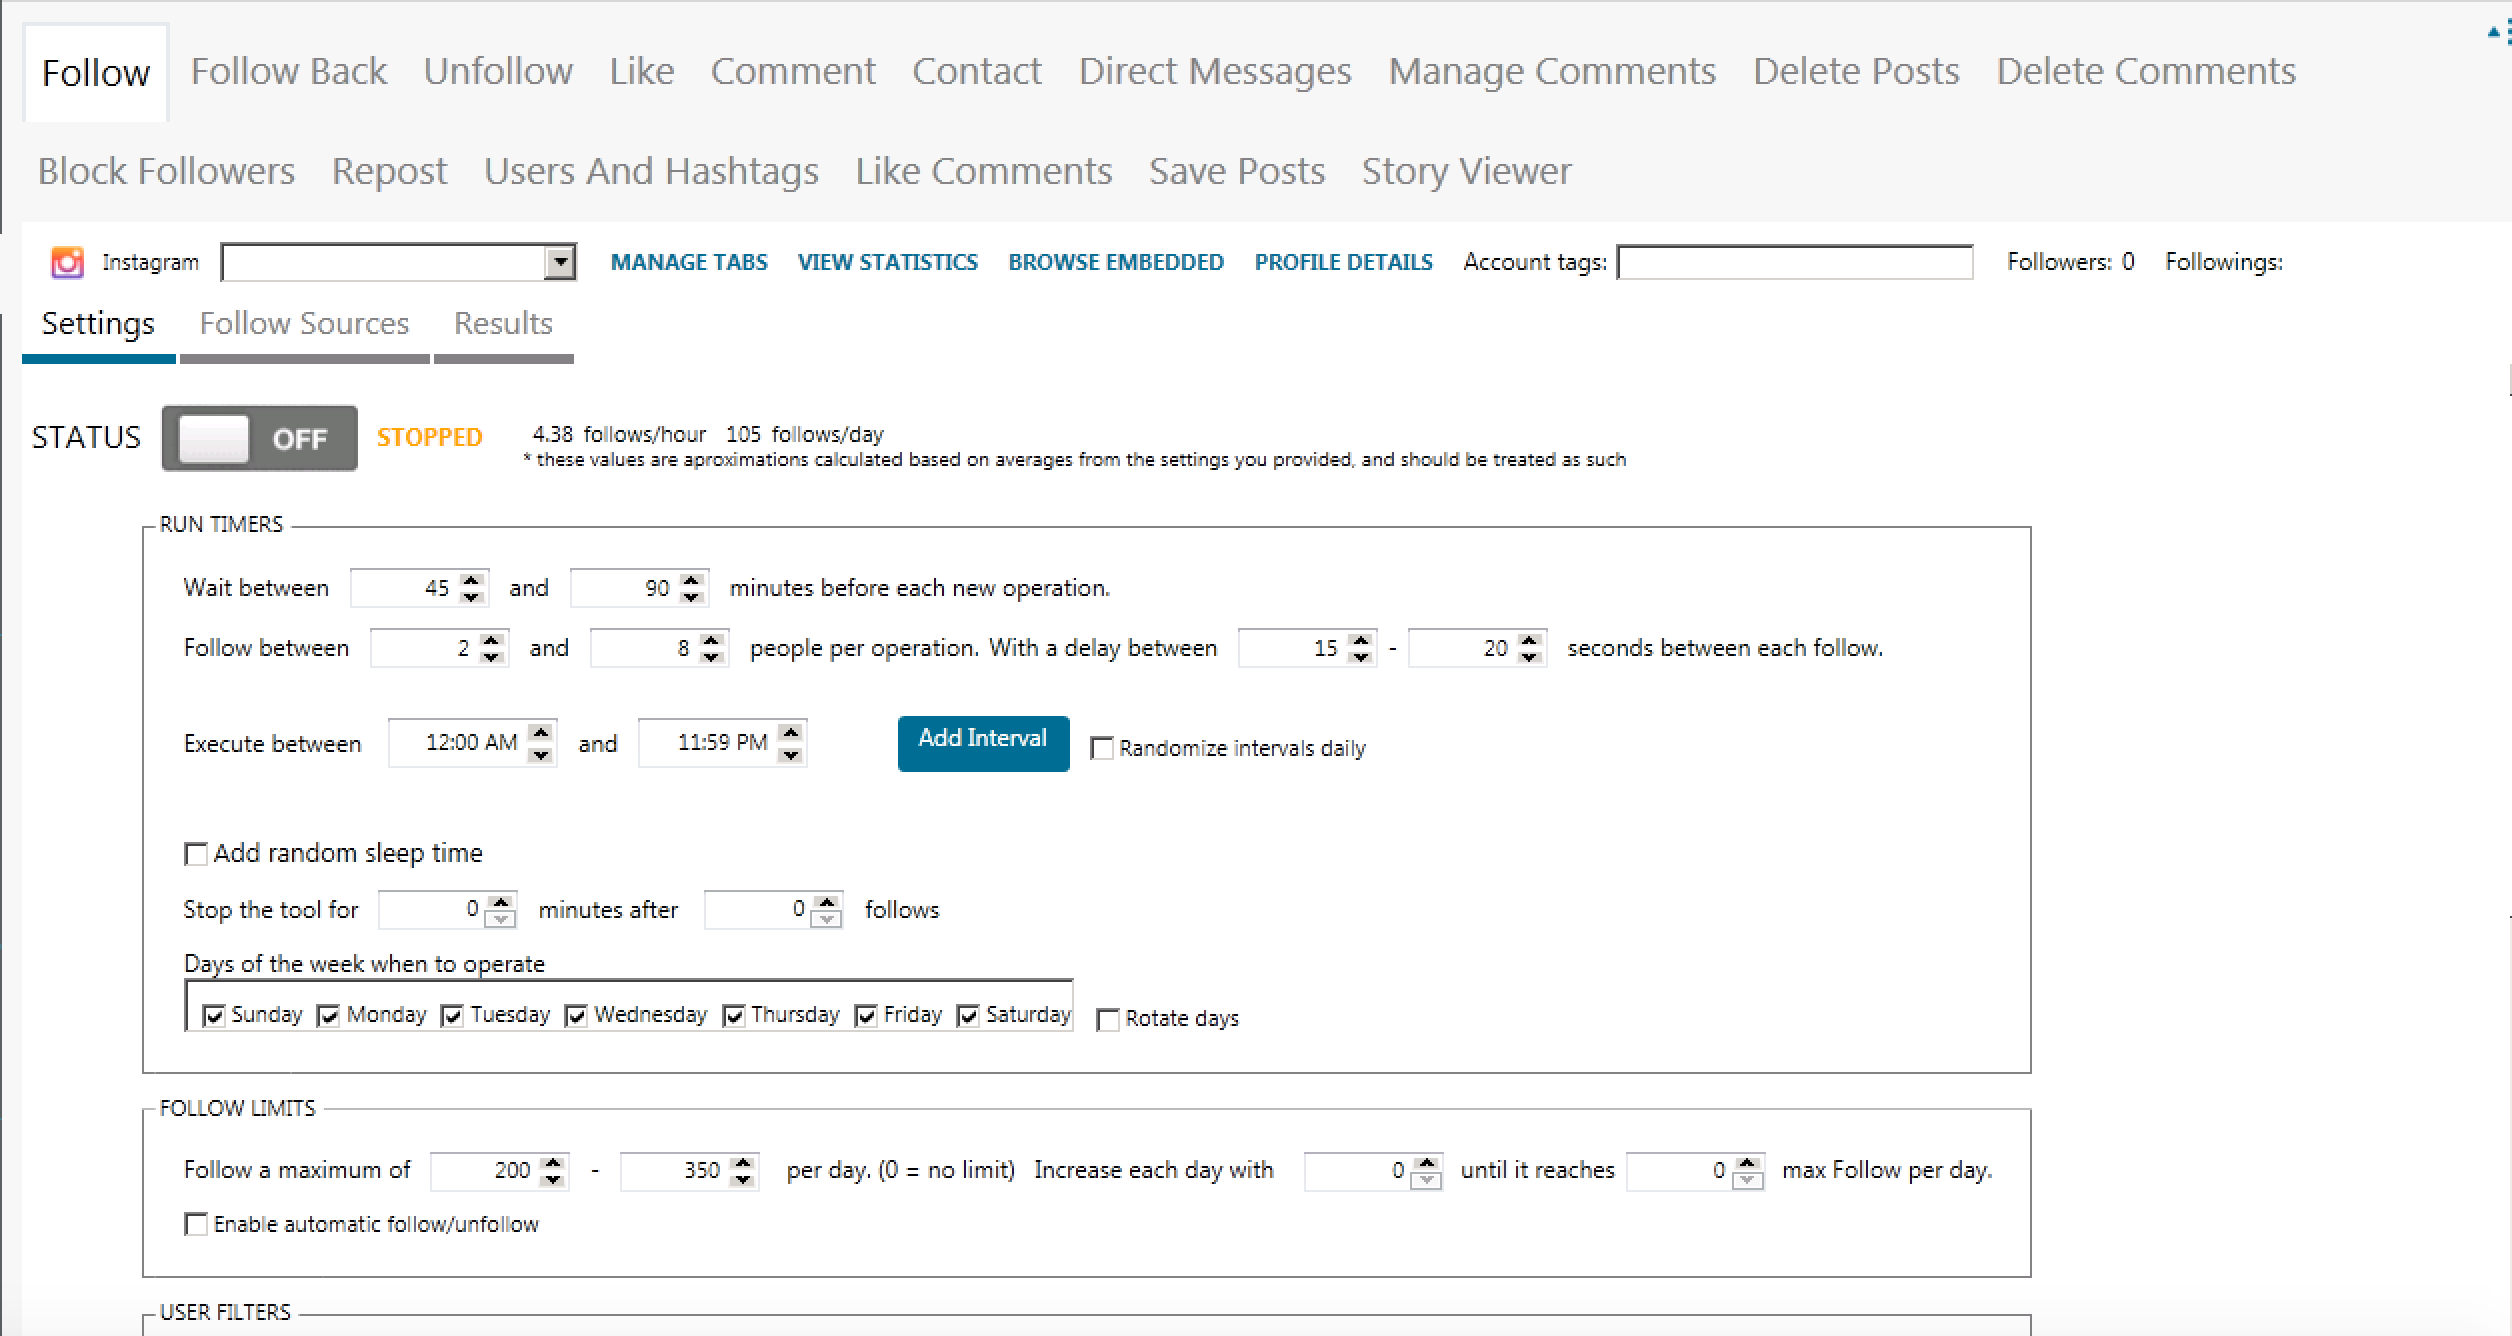
The Instagram tools are quite similar to the twitter settings. For example, the first few tools are pretty much identical to the twitter tools. The settings start to get different after "contact". Instagrams tools let you automate your messages, comments, stories and hashtags as well. With this tool in particular, you want to be extra careful in how heavy you use the automation. Instagram is very suspicious of any kind of automation so you want to start this off very slowly.
Summary
In these examples, I've shown you how to set up the bot for your Twitter, Instagram and Facebook accounts. The key to using this tool to it's fullest potential is making it act like a human. You may be thinking why not just leave it running all the time, following, connecting, commenting to thousands of people? The reality is all of these social media platforms don't like these bots, and are always on the lookout for suspicious behaviour. Giving the impression that you are human might not give you a massive online presence overnight, but after a while, you can begin to speed up as your following increases and before you know it, your social accounts will have a great reputation that can lead to plenty of business opportunity in the future. If you would like Massplanner get in touch and ill see what I can do for you.
Agar Aapko ye Article pasand aaya to aap hamare YouTube Channel ko Subscribe kar sakte hai. Aap hame Twitter aur Facebook par bhi follow kar sakte hai

Post a Comment